
I
started this project after work this evening and it was easy and
rewarding. I love some instant gratification. I have MISSED DIY projects
and look forward to picking them back up regularly after the move.
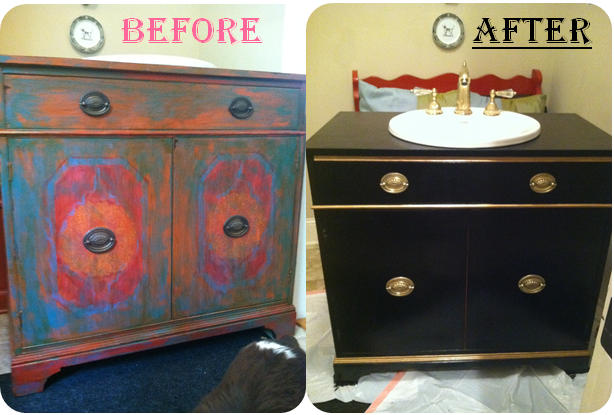
This great find came from Studio123 -- one of my favorite places to browse frequently. While this paint job may have looked perfect in lots of spaces, it was not the look I had in mind for our powder room so I got to work!
The guy doing the cabinets at the house was nice enough to help me convert this into a vanity by cutting a hole for the sink and making the top drawer stationary. That is above my skill set!

Step
1: Brasso the hardware. Nothing short of
a $3 miracle worker! It could get
addictive…


You
may remember this hardware I ordered off Etsy from my inspiration board. I
ended up deciding I liked the original better with the style & lines of the piece-- especially after the Brasso wonder.
What do you think? Anyone want
the these pulls? I have three.

Look
what a difference just polishing up the hardware did!

Someone refused to get out of my pictures tonight!! :)
Step 2: Then
I continued to work my arms out and sanded, sanded, sanded. I did NOT need to prime after this step.

Step 3: Next
I got out my new Purdy brush and high gloss black paint. I typically use Sherwin-Williams for projects
like this (especially since they are a McKinney client), but happened to be in
Ace Hardware so I went with Benjamin Moore.
The key is to tell the paint experts what your project is so they can
advise you on what type of paint you need. The Purdy brush is an absolute must -- I don't paint with any other brand.

Two
things I loved about this particular paint: quick drying and easy clean
up. Josh came home from working out as I
was painting my first coat and Olivia ran to the door and stepped on the paint
can lid. Josh quickly put her paw under
cold running water and it washed right off.
Crisis averted!

This
was after the first coat, but I ended up doing 3 good coats. They dried SO FAST that by the time I was
finished with the last side I could go back to the first side for the next
coat.

Step
4: I used painter’s tape to help guide where I’d add the gold accents. Then I used my favorite gold leaf paint for
this part. This stuff is very thin, but
has excellent coverage. It looks like I
barely used any out of the small jar.

Meanwhile,
someone seemed to get quite bored with this project.

Step
5: I decided to put the hardware back on to see if the gold paint complemented
it and to guide me on how much more to do, so I didn’t overdo gold.

Step
6: Rigged the sink and faucet to get a true idea of how it would look
installed.


Step
7: Then I got really crazy and hung the mirror on an existing nail in our
laundry room for a true idea of the finished product.

Side
by side comparison shot
XO,
Whit


